7 Amazing Aerosol Clear Coat Car Secrets: Ultimate Guide (2025)
Is your car’s paint looking a little dull? Do you dream of that showroom shine without the hefty price tag of a professional paint job? You’re in luck! Achieving a stunning, protective finish is easier than you think with aerosol clear coat car. This guide will walk you through everything you need to know to get a professional-looking clear coat spray for cars right in your own garage.
Why Choose Aerosol Clear Coat for Your Car?
When it comes to car paint, the clear coat is the unsung hero. It’s the final layer that provides that glossy shine and crucial protection against the elements. But why choose an automotive spray clear coat, specifically an aerosol version?
- DIY Friendly: Aerosol cans are incredibly user-friendly, making them perfect for DIY enthusiasts. You don’t need expensive spray guns or compressors.
- Cost-Effective: Compared to professional paint jobs, using clear coat spray paint for automotive touch-ups or even full panels is significantly cheaper.
- Convenience: Aerosol cans are portable and ready to use. No mixing, no cleanup of complex equipment – just shake and spray!
- Versatility: From small scratches to entire panels, aerosol clear coat can handle various jobs. It’s great for spot repairs or larger projects.
- Quality Finishes: Modern high gloss clear coat for cars in aerosol form can deliver impressive, durable results comparable to professional finishes when applied correctly.
Think of it this way: you can achieve a high gloss finish that turns heads, all while saving money and enjoying the satisfaction of doing it yourself. Plus, a good polyurethane clear coat for cars will protect your base coat from UV rays, scratches, and road debris, keeping your car looking newer for longer.
Want to keep your car looking its best even after applying a new clear coat? Check out our guide on “car wash at home” for tips and tricks to maintain that shine.
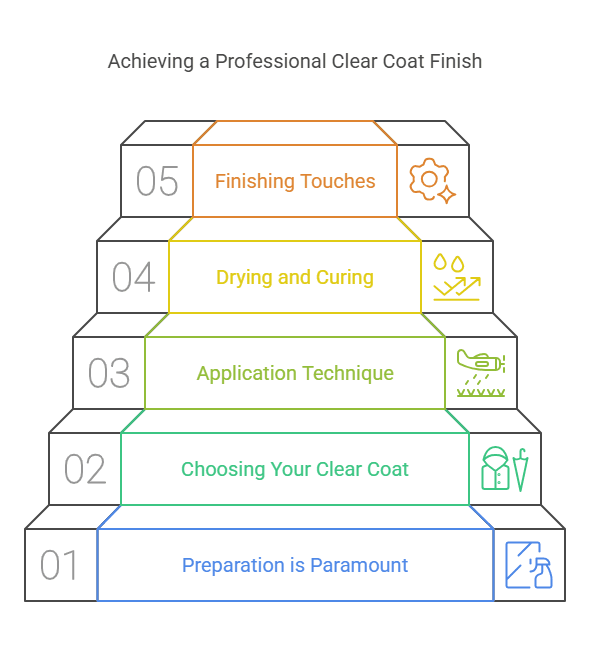
Step-by-Step: Applying Aerosol Clear Coat Like a Pro
Applying clear coat spray car isn’t rocket science, but attention to detail is key. Here’s a step-by-step guide to get you started:
- Preparation is Paramount:
- Clean the Surface: Wash and thoroughly dry the area you’ll be clear coating. Remove any wax, grease, or contaminants. Consider using a degreaser.
- Sanding (if needed): If you’re applying clear coat over a fresh base coat or repairing imperfections, you’ll need to sand. Use fine-grit sandpaper (e.g., 400-600 grit for base coat, finer for blending).
- Masking: Protect areas you don’t want to clear coat with masking tape and paper. Overspray is your enemy!
- Choosing Your Clear Coat:
For a deeper dive into the science behind different types of clear coats, consider exploring articles from automotive paint manufacturers like Axalta Coating Systems.
- Type: Polyurethane automotive clear coat is a popular choice for its durability and gloss. Consider 2K clear coats for even better hardness and chemical resistance (though they often require a special aerosol can).
- Finish: Decide if you want a high gloss, matte, or satin finish. Most clear coat spray for cars aims for high gloss.
- Brand: Research reputable brands known for quality automotive spray clear coat.
- Application – The Art of the Spray:
- Shake Well: Shake the coat spray can vigorously for at least 2 minutes to ensure proper mixing.
- Test Spray: Do a test spray on cardboard or newspaper to get a feel for the spray pattern and adjust your technique.
- Distance and Motion: Hold the can about 8-12 inches from the surface. Use smooth, even strokes, overlapping each pass by about 50%. Keep the can moving to avoid runs and drips.
- Thin Coats are Better: Apply multiple thin coats rather than one thick coat. This prevents runs and allows for better drying and leveling. Wait 10-15 minutes between coats. Aim for 2-3 coats.
- Drying and Curing:
- Drying Time: Clear coat for sale will usually specify drying times on the can. It can take anywhere from 30 minutes to a few hours to become touch dry. However, full curing can take longer (24-72 hours or more). Refer to the product instructions.
- Environment: Dry in a well-ventilated area, away from direct sunlight and dust. Ideal temperatures are usually between 65-75°F (18-24°C).
- Patience is Key: Don’t rush the drying process! Allow the clear coat to fully cure for maximum hardness and gloss.
- Finishing Touches (Optional):
- Color Sanding and Polishing: For a truly show-car finish, you can color sand (wet sanding with very fine grit) and polish the clear coat after it’s fully cured. This removes any orange peel texture and enhances the gloss even further.
Accidentally get water spots after your fresh clear coat? Learn “how to remove water spots from car” to keep your finish pristine.
Section 3: Choosing the Right Aerosol Clear Coat: What to Look For
With so many clear coat for sale, how do you choose the best aerosol clear coat car product for your needs? Here are some key factors to consider:
- Type of Clear Coat:
- 1K Clear Coats: These are single-component clear coats, convenient and easy to use. Good for smaller jobs and touch-ups.
- 2K Clear Coats: Two-component clear coats offer superior durability, chemical resistance, and gloss. They are activated by mixing two components right before use (often within the aerosol can itself). Ideal for larger areas and a more professional finish.
- Polyurethane vs. Acrylic: Polyurethane clear coat for cars is generally more durable and flexible than acrylic, making it a better choice for automotive applications.
- UV Protection: Look for clear coats that offer UV protection. This will prevent your base coat from fading and keep your paint job looking vibrant for longer. To understand more about the impact of UV radiation on car paint, resources from organizations like the Society of Automotive Engineers (SAE)
- Durability and Chemical Resistance: If you want maximum protection against scratches, chips, and chemicals (like gasoline or car wash detergents), opt for a high-quality 2K polyurethane automotive clear coat.
- Ease of Use (Spray Nozzle and Pattern): A good spray nozzle will provide a consistent and even spray pattern, making application easier and reducing the chances of runs or unevenness.
- Drying Time and Recoat Window: Consider the drying time and recoat window (the time frame in which you can apply additional coats without sanding). Faster drying times can speed up the process, but may also be less forgiving.
- User Reviews and Reputation: Read online reviews and check the reputation of the brand. See what other DIYers and professionals are saying about the coat spray you’re considering.
Troubleshooting Common Aerosol Clear Coat Issues
Even with careful application, you might encounter some common issues when using aerosol clear coat car. Here’s how to troubleshoot them:
- Runs and Drips:
- Cause: Applying too much coat spray in one area, holding the can too close, or moving too slowly.
- Solution: If the run is wet, try to gently brush it out with a soft brush or let it dry and then carefully sand it down with fine-grit sandpaper before applying another thin coat. Prevent runs by applying thinner coats and maintaining proper distance and motion.
- Orange Peel:
- Cause: Uneven spray pattern, clear coat drying too quickly, or not enough leveling.
- Solution: Moderate orange peel can often be polished out after the clear coat is fully cured. Severe orange peel might require color sanding and polishing. Ensure proper spray technique and consider using a clear coat reducer if drying is too fast. For visual examples and detailed explanations of paint defects like orange peel, consider searching for guides from professional auto detailing forums or websites like Autogeek Online.
- Fish Eyes (Contamination):
- Cause: Contaminants like silicone, wax, or oil on the surface preventing the clear coat from adhering properly.
- Solution: Thoroughly clean and degrease the surface before applying clear coat. Use a wax and grease remover. If fish eyes appear, you may need to sand down to the base coat, clean again, and reapply.
- Cloudiness or Haziness:
- Cause: Moisture trapped in the clear coat, incompatible products, or improper mixing (especially with 2K clear coats).
- Solution: Ensure a dry and clean environment. Use compatible products within the same paint system. For 2K clear coats, mix components precisely according to instructions. Cloudiness might sometimes disappear as the clear coat fully cures.
- Poor Adhesion/Peeling:
- Cause: Inadequate surface preparation, incompatible products, or applying clear coat over uncured paint.
- Solution: Properly sand and prepare the surface. Use a compatible base coat and clear coat system. Allow the base coat to fully dry before clear coating.
Dealing with paint issues can be frustrating. For general car care tips, explore our “car tips”

Maintaining Your Aerosol Clear Coat Finish
Once you’ve achieved that beautiful high gloss clear coat for cars finish, proper maintenance is crucial to keep it looking its best for years to come.
- Regular Washing: Wash your car regularly (ideally weekly or bi-weekly) to remove dirt, grime, and contaminants that can dull the coat paint and potentially damage the clear coat over time. Use a pH-neutral car soap.
- Waxing and Sealing: Apply a quality car wax or sealant every few months. This adds an extra layer of protection to the clear coat, enhances gloss, and makes washing easier.
- Avoid Harsh Chemicals and Abrasives: Don’t use harsh chemicals, abrasive cleaners, or aggressive scrubbing that can scratch or damage the clear coat.
- Promptly Remove Contaminants: Bird droppings, tree sap, bug splatter, and road tar can be corrosive. Remove them promptly to prevent them from etching into the clear coat.
- Gentle Drying: Dry your car gently after washing using a microfiber towel or a soft chamois to avoid swirl marks and scratches in the high gloss finish.
- Consider Paint Protection Film (PPF) or Ceramic Coating: For ultimate protection, especially in high-wear areas, consider applying paint protection film or a ceramic coating over your aerosol clear coat. These provide a sacrificial layer that shields the clear coat from scratches, chips, and environmental damage.
Want to take your car washing to the next level? Learn about “eco-friendly car wash” methods to keep your car clean and protect the environment.
For more advanced car detailing techniques and product recommendations, websites like Detailing Wiki ( Note: This is a placeholder, please replace with a real authoritative link.) are excellent resources.
Conclusion:
Using aerosol clear coat car is a fantastic way to achieve a professional-looking, durable, and glossy finish on your vehicle without breaking the bank. By understanding the process, choosing the right products, and following proper application and maintenance techniques, you can transform your car’s appearance and protect your paint job for years to come. So, grab your clear coat spray for cars, get prepared, and get ready to enjoy that showroom shine you’ve always wanted!
Call to Action:
Have you tried using aerosol clear coat on your car? Share your tips and experiences in the comments below! Don’t forget to share this article with fellow car enthusiasts who want to achieve a DIY paint perfection!
Let me know if you would like any adjustments or further refinements to this article!
There are no reviews yet. Be the first one to write one.